Start here
The first-run tutorial opens with Fill the gap to clear lines. Compare the vertical yellow pair in the tray with the aligned gaps in two rows.
Read the controls, follow the real example and compare the result before trying your own run.
Play Gridora →A ManyPlay browser walkthrough · Checked . Screenshots below show the actual game. Illustrated catalog covers are presentation artwork. Who publishes these games?
Example: the first tutorial clear
The first-run tutorial opens with Fill the gap to clear lines. Compare the vertical yellow pair in the tray with the aligned gaps in two rows.
In the shown opening arrangement, the two yellow rows share an empty cell in the fourth column from the left. The tray contains exactly the vertical pair needed for that gap.
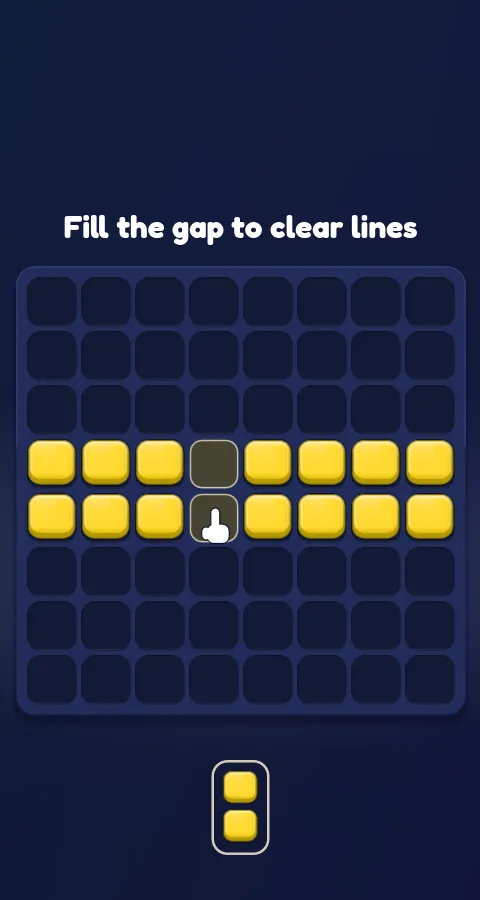
Compare the pair with the aligned empty cells. It can fill both missing cells in one placement.
Drag the pair so its lifted preview covers the gaps, then release. After the rows clear, the next tutorial says Columns clear too.
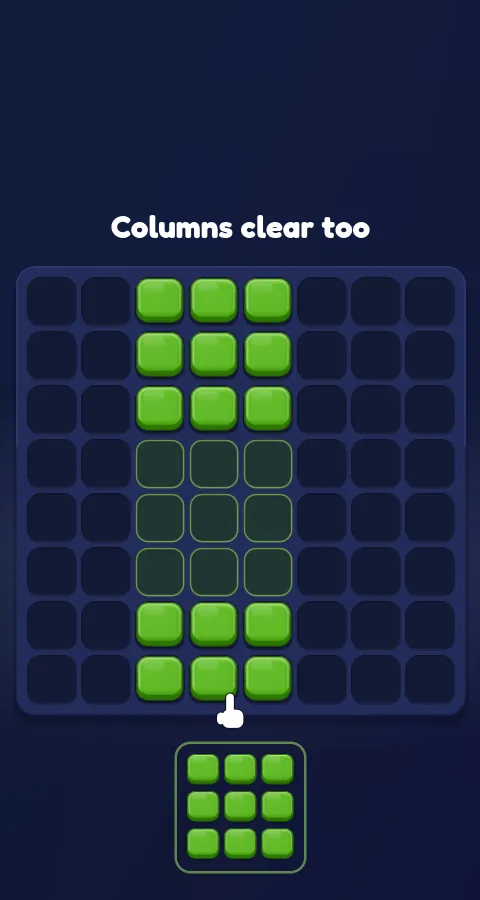
The shape covers both missing cells at once. Completing the rows clears occupied space; simply dropping the pair somewhere else would not demonstrate the same result.
Gridora places tray shapes on an 8×8 board. Reverse Blocks has a different timed-arrival and storage system. Their guides and controls are separate.
It completed the two yellow tutorial rows. The game then advanced to Columns clear too. That is the first tutorial step; a full run goes on from there.
The following tutorial demonstrates column clearing. The supplied browser build also defines further tutorial and game modes; this example verifies only the first row clear and the observed next screen. A full run continues well beyond the tutorial.
Report a changed rule or control. Browser and Android editions can differ; the checked date describes this walkthrough, not a new game release.
Gridora’s opening tutorial uses a small vertical pair to make a larger point: every cell of a shape must fit, and a placement is useful when it completes the intended line. The lifted preview explains why aiming only with the pointer can put a piece in the wrong place.
The first tutorial shows two nearly complete yellow rows with aligned empty cells in the fourth column from the left. The tray holds a vertical two-cell pair. Treat those two missing cells as one footprint to match, rather than two separate taps to make.
Before dragging, compare the orientation of the piece with the orientation of the gap. A vertical pair can cover both aligned cells at once. Placing the same piece somewhere else on the board may occupy legal space without completing either intended row. The tutorial is asking for a specific consequence, not simply any placement that the board accepts.
During a drag, the piece preview sits above the pointer. On a touch screen this can help keep the target visible around a finger; on a desktop it means the pointer position alone does not describe the occupied cells. Aim using the lifted shape you can see.
Move until both squares of the preview line up with the two missing cells, then release. If a placement does not produce the expected clear, inspect the preview’s offset and the entire shape before trying a different location. Do not repeatedly drop at the same pointer coordinate without checking where the lifted cells actually land.
The checked placement completed the two yellow rows. The game then showed the next instruction, Columns clear too. That transition confirms the first row-clear tutorial step and gives a useful boundary for the example.
It does not establish a full campaign win or a finished score run. A tutorial can contain several steps with different goals. Once the next instruction appears, read it as a new task. The row example explains how to fill a line; it does not tell you to keep copying the same position when the following column arrangement changes.
Count the contiguous cells a piece needs rather than only the total empty cells on the board. A few scattered squares are not equivalent to the connected footprint of a tray shape. The same observation helps you understand why a piece can look small enough yet still fail to fit a particular region.
Then ask what becomes full after the placement. A full row or column clears, which reopens occupied space. A shape that fits without finishing a line can still be a deliberate move, but it does not demonstrate the same clearing result as the opening tutorial. The guide keeps those two effects separate.
Gridora uses an 8×8 board and tray shapes. Reverse Blocks is another ManyPlay game with a different system: incoming pieces are timed, Storage capacity matters, pieces can be rotated and the checked board has ten columns. A strategy that assumes one game’s controls or timer should not be carried over without checking.
Choose Gridora when you want to practise fitting whole tray shapes into available space. Choose Reverse Blocks when you want timed arrivals, rotation and decisions about Storage. For Gridora’s next tutorial step, look for a nearly complete column and match the new tray piece to its gaps. The first two-row clear establishes the aiming technique; the next arrangement asks you to apply it in a different direction.
Dragging is not the only way to place a piece in the checked browser version. You can tap or click a tray piece to select it, tap a board cell to display a valid placement preview, then tap that same target again to confirm. Inspect the whole highlighted footprint before confirming: the preview is an intermediate state, not a placed piece.
In the checked Classic board on October 29, a vertical yellow four-cell piece was selected in the right tray slot. The first board tap outlined four empty cells along the left edge; the second tap committed the piece. Score changed from 0 to 4 and that tray piece disappeared. No full row or column cleared in this placement. It demonstrates the tap control, not the two-row tutorial clear shown earlier.
After a page reload, the catalog showed the game poster again. Choosing Play and then Classic restored the four newly occupied cells, Score 4 and the remaining tray pieces in the same browser. A return to the main menu did not by itself mean that the board was lost.
This checks one Classic position in one browser. It does not establish cross-device synchronisation, permanence after clearing site data, a shared Daily board or a completed Classic run. Read the current board after reopening instead of assuming that every mode uses the same save behaviour.
Explanation checked 2026-10-29.